Real-Time Visualization With React and D3.js
Introduction
This blog post will teach you how to create a React app and WebSocket that connects to the Flask server and visualize streaming data in real-time using D3.js. I decided to write it as a part of my learning path, and I hope to help anyone struggling with the same problems while trying to implement something similar. I decided to tackle the frontend implementation by visualizing Twitter users who retweeted something with the hashtag #christmas. Each community of users is presented with a different color which allowed me to notice the important communities in the Twitter network.
The frontend service is a part of a web application that you can find in the GitHub repository. Besides that, the repository also holds a visualization that discovers the most Christmassy person on Twitter using the dynamic PageRank algorithm.
Prerequisites and app architecture
If you are using Windows, you need to install Windows Subsystem for Linux (WSL) and then Docker Desktop. On the other hand, if you are a Linux user, just install Docker and Docker Compose.
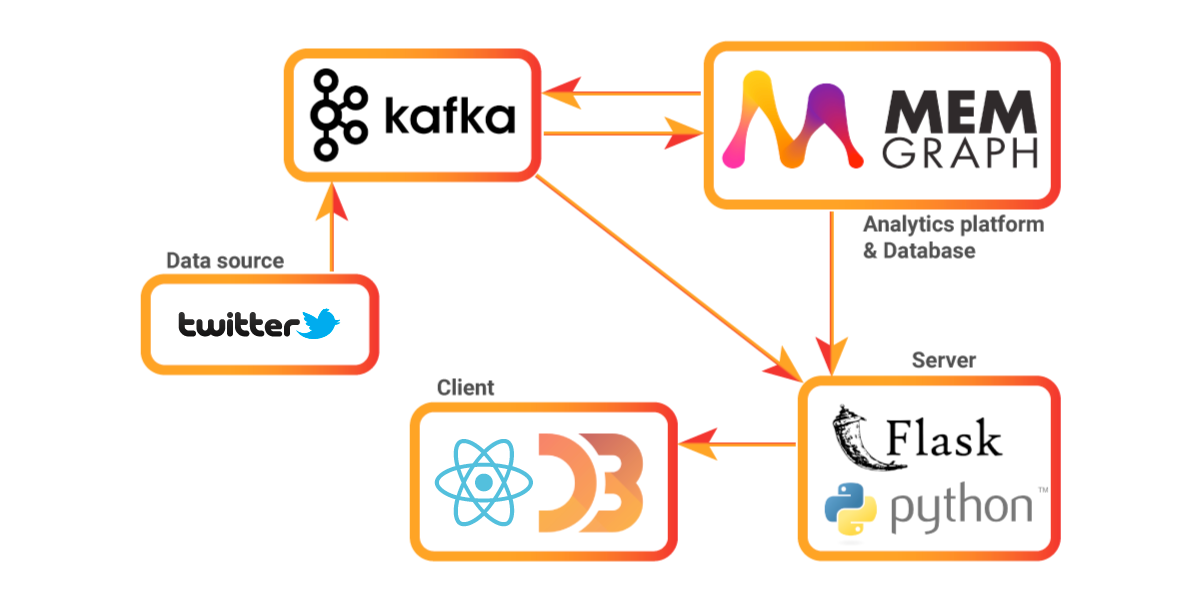
The app is dockerized and it consists of five services:
stream: A Python script collects new retweets with the hashtag #christmas and sends them to a Kafka cluster.kafka: A Kafka cluster consisting of one topic namedretweets.memgraph-mage: The graph analytics platform where we store the incoming Twitter data from Kafka and perform dynamic PageRank and dynamic community detection on all Twitter users.backend-app: A Flask server that sends all the data we query frommemgraph-mageto thefrontend-app. It also consumes the Kafka stream and sends it to thefrontend-app.frontend-app: A React app that visualizes the Twitter network using the D3.js library.
Project structure
You can see the whole project structure in the GitHub repository. The blog post focuses on the frontend service and explains how the visualization was created.
|   docker-compose.yml
|
+---backend
|       Dockerfile
|   +---server
|   +---tests
|
+---frontend
|   |   .dockerignore
|   |   Dockerfile
|   |   package.json
|   |   package-lock.json
|   +---node_modules
|   +---public
|   +---src
|
+---memgraph
|   |   Dockerfile
|   |   requirements.txt
|   +---procedures
|   +---transformations
|
+---stream
|   |   Dockerfile
|   |   kafka_utils.py
|   |   produce.py
|   |   requirements.txt
|   +---data
The frontend folder was created using the create-react-app npm package. If you are starting from scratch and want to create a React app follow these steps:
- Place yourself in the root folder of your project.
- Run
npm install -g create-react-app(if you don't want to install the latest version, you can specify the version of thecreate-react-app, for example,create-react-app@5.0.0). - Next, run
npm init react-app frontend --use-npm, which will initialize thereact-apppackage in thefrontendfolder. - In the end, place yourself in the
frontendfolder by runningcd frontendand start the app withnpm start.
Even a simpler way of creating a React app is by using npx - a package runner tool that comes with npm 5.2+. Then you just have to run:
npx create-react-app frontend
cd frontend
npm start
Socket.IO library
I have used socket.io-client@2.3.1 since I had issues with the latest version. I am going to explain the process on the CommunityDetection component, since it's very similar to the PageRank component. If you are running the frontend application locally, and not using the provided dockerized application, make sure to install the library by running:
npm install socket.io-client@2.3.1
Don't forget that Node.js is a prerequisite for using
npm.
First, I imported the socket I'm using on the client side. Backend is implemented with Flask.
import io from "socket.io-client"After that, I initialized the socket.
const socket = io("http://localhost:5000/", { transports: ["websocket"] })I set the socket to listen to the server running at http://localhost:5000/. Then I established the connection to the server with the websocket. When the connection is established, the socket emits the consumer signal. This signal is also emitted on the server side, whenever a new message is sent. This configuration allows the socket to receive all messages related to the consumer signal.
socket.on("connect", () => {
    console.log("Connected to socket ", socket.id)
});

socket.on("connect_error", (err) => {
    console.log(err)
    // try reconnecting
    socket.connect()
});

socket.on("disconnect", () => {
    console.log("Disconnected from socket.")
});

socket.on("consumer", (msg) => {
    console.log('Received a message from the WebSocket service: ', msg.data);
    }
React.Component lifecycle
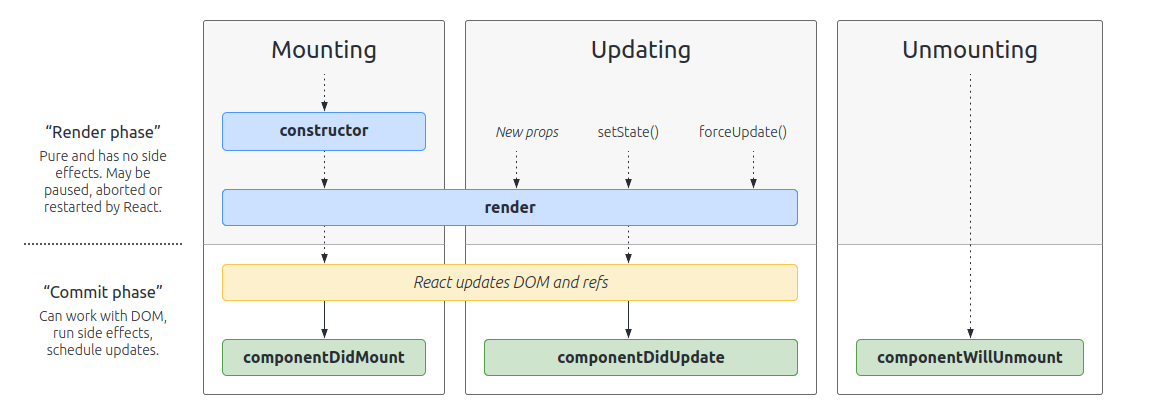
You may ask yourself where to place all this socket.io code within a React component. First, I initialized the socket in the App component that is the parent component of PageRank and CommunityDetection components. After that, I placed the socket events in componentDidMount() lifecycle method of the child components. This part of the React.Component lifecyle is invoked once, immediately after a component is mounted. If you need to load data from a remote endpoint, this is a good place to instantiate the network request. This method is also a good place to set up any subscriptions. That's why I have decided to place all socket events there. On each consumer emit, the state of the component will be updated and that will trigger an extra rendering which will happen before the browser updates the screen, so the user won't see the intermediate state. Before I set up the socket, at the beginning of the componentDidMount(), I made a simple HTTP request that will trigger the backend to start producing the needed data.
async firstRequest() {
    let response = await fetch("http://localhost:5000/health")

    if (!response.ok){
        throw new Error(`HTTP error! status: ${response.status}`);
    }
    else
        console.log(response)
}
After that, I initialized everything that was necessary for drawing using D3.js in the initializeGraph() method. By setting a new state of nodes and links with setState() on each consumer emit, componentDidUpdate() lifecycle method will be called. I am updating the graph by drawing new incoming nodes and links in that method. This lifecycle method is not called for the initial render, and that's why I initialized everything in the initializeGraph() method.
At the end, when the component unmounts, the componentWillUnmount() lifecycle method is called, and the client disconnects from the server.
componentWillUnmount() {
    this.socket.emit('disconnect');
    this.socket.disconnect();
}
If you want to learn more about
React.Componentlifecycle methods, check out the React official docs.
Visualizing with D3.js
I wanted to draw the graph on svg using D3.js within the class component. You can do that by creating a reference in the component constructor that will be attached to the svg via the ref attribute. In constructor createRef() method is used.
constructor(props) {
    super(props);
    this.myReference = React.createRef();
    this.state = {
        nodes: [],
        links: []
    }
    this.socket = this.props.socket
}
Then, in the component's render() method I added the ref attribute with value this.myReference to the svg.
render() {
    return (<div className="CommunityDetectionDiv">
        <h1>Community Detection</h1>
        <svg className="CommunityDetectionSvg" ref={this.myReference}
            style={{
                height: 700,
                width: 1000,
                marginRight: "0px",
                marginLeft: "0px",
                background: "white"
            }}></svg></div>
    );
}
Now, by selecting the current attribute of the reference, it's easy to get the svg on which the graph is drawn.
var svg = d3.select(this.myReference.current);If you want to know how to use
D3.jswithin function component, check out one of my previous blog posts - Twitch Streaming Graph Analysis - Part 2.
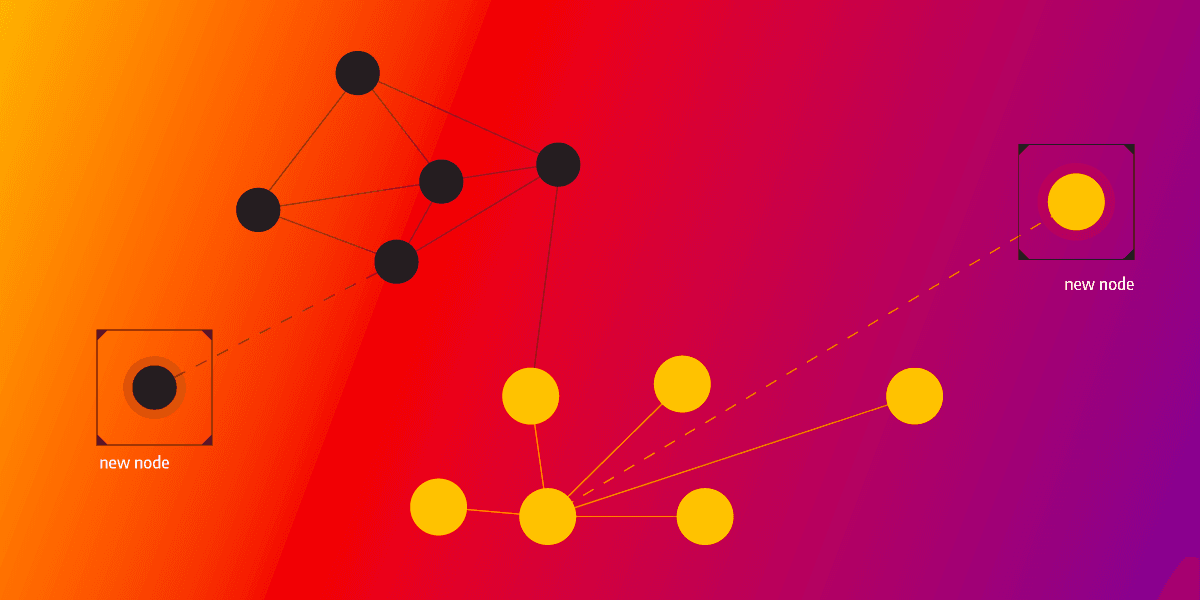
In the updateGraph() method I drew the nodes and relationships using D3.js, where nodes are colored depending on the community they belong to. The community information is being received through each node's cluster property.
// Remove old nodes
node.exit().remove();

// Give attributes to all nodes that enter -> new ones + merge - update the existing DOM elements
node = node.data(this.state.nodes, (d) => d.id);
node = node
    .enter()
    .append('circle')
    .merge(node)
    .attr("r", function (d) {
        return 7;
    })
    .attr('fill', function (d) {
        let cluster = d.cluster
        let key = cluster.toString()
        if (!(key in clusterColors)) {
            clusterColors[key] = "#" + Math.floor(Math.random() * 16777215).toString(16)
        }
        return clusterColors[key]
    })
    .on("mouseover", function (d) {
        tooltip.text(d.srcElement["__data__"]["username"])
        tooltip.style("visibility", "visible")
    })
    .on("mousemove", function (event, d) { return tooltip.style("top", (event.y - 10) + "px").style("left", (event.x + 10) + "px"); })
    .on("mouseout", function (event, d) { return tooltip.style("visibility", "hidden"); })
    .call(this.drag());
First, the old nodes are being removed, and the node value is set to the new nodes' data. With the enter() method, attributes of the incoming nodes are set. With merge() method the existing DOM elements are updated. The color of the node is being updated depending on the cluster it belongs to. I have previously created a map of colors called clusterColors. When a new cluster appears, a new key-value pair is created in the map, where the key is the cluster number and the value is a randomly generated color. If the cluster of the node already exists, then the color of the node will be the value of that cluster key in the clusterColors map. I added the links between the nodes similarly. All that's left to do is to create the simulation on new nodes and links.
// Set up simulation on new nodes and links
try {
    simulation
        .nodes(this.state.nodes)
    forceLink.links(this.state.links)
} catch (err) {
    console.log('err', err);
}
Simulation has been initialized in the initializeGraph() method:
// set up simulation
simulation = d3
    .forceSimulation(nodes)
    .force('link', forceLink)
    .force(
        'collide',
        d3
            .forceCollide()
            .radius(function (d) {
                return 20;
            })
    )
    .force("center", d3.forceCenter(width / 2, height / 2))
    .force(
        "x",
        d3.forceX().strength(0.05)
    )
    .force(
        "y",
        d3.forceY().strength(0.05)
    );


simulation.on("tick", () => {
    node.attr("cx", (d) => d.x).attr("cy", (d) => d.y);
    link
        .attr('x1', (d) => d.source.x)
        .attr('y1', (d) => d.source.y)
        .attr('x2', (d) => d.target.x)
        .attr('y2', (d) => d.target.y);
});
I've created the force between the nodes and links, where each link has an unique id which we created by adding the attribute id .attr('id', (d) => d.source.id + '-' + d.target.id) to each link. That id is created from the ids of the nodes the certain link is connecting. Collide force is there so that the nodes are not overlapping, considering the size of their radius. Here we have set the radius to size 20, which is larger than 7 - the radius of the nodes. There is also a center force forcing the nodes and links to appear at the middle of the svg.
And how this looks? Check out the GIF below for the preview, and if you want to start the app all by yourself, follow the instructions at the README in the repository.
The PageRank visualization code is similar. The notable difference is in the radius of each node and the color of the nodes.
 node = node
    .enter()
    .append('circle')
    .merge(node) //returns a brand new selection that contains both enter and update selection
    .attr("r", function (d) {
        return d.rank * 700;
    })
    .attr('fill', 'url(#gradient)')
    .on("mouseover", function (d) {
        tooltip.text(d.srcElement["__data__"]["username"])
        tooltip.style("visibility", "visible")
    })
    .on("mousemove", function (event, d) { return tooltip.style("top", (event.y - 15) + "px").style("left", (event.x + 15) + "px"); })
    .on("mouseout", function (event, d) { return tooltip.style("visibility", "hidden"); })
    .call(this.drag());
You can see that the attribute r is proportional to rank (calculated PageRank of each node). Also, the fill attribute is determined by the gradient created in the defineGradient() method.
Conclusion
There is still a lot left to learn regarding the React, D3.js and WebSocket, but creating this demo application gave me a pretty good insight into the real-time visualization. It was fun playing with it, and I'm looking forward to learning more in the future. Also, I would like to emphasize that Reddit network explorer application, developed by my colleagues Ivan, David and Antonio, helped me a lot. There, you can find real-time visualization with frontend in Angular. For any feedback or questions ping me or Memgraph team at our Discord server.